
Hayes/BrakeSmart/MaxBrake Controllers
7/5/2017
For an alternative solution to a brake controller by using the HDT trailer air brake lines to the trailer, see BluDot System.
Electric Brake Controllers:
From reading the Forum, the majority of people who've done HDT conversions use either the Tekonsha Prodigy electronic proportional brake controller or the Hayes #100400B air actuated true proportional brake controller which was discussed by several people who had issues with the controller. Hayes controllers are installed similar to the MaxBrake and BrakeSmart units except for the sensor. The Hayes is directly connect to the air system using the same air port..
The analysis appears that the mass of a HDT in a braking situation does not generate enough deceleration movement (nose dipping) to cause the Prodigy or the Genesis controller to function as expected. A better solution is a brake controller that activates the trailer brakes because the truck brakes are being applied, not because an inertia sensor senses the truck is stopping. The BrakeSmart, now the MaxBrake Controller fit this description because they use hydraulic or air pressure to activate the trailer brakes. Even if the truck is accelerating, like downhill, the BrakeSmart/MaxBrake controllers will applied trailer brakes when the truck brakes are applied.
The BrakeSmart and MaxBrake controllers mentioned here are no longer available. The similar and probably better solution is the Tuson DirecLink Controller. The installation of the DirecLink is only a cable plugging into the ECM data port and the brake wire. There has been little in special installation for the DirecLink.

BrakeSmart Brake Controller:
(Note - no longer available, replaced by MaxBrake below)
However, there is a growing number of us who agree that the more expensive BrakeSmart air activated electronic proportional brake controller is the best of the pack for our applications which is one of the reasons you'll pay a premium price "$435.00 + S&H" for the BrakeSmart controller and vehicle specific wiring harness.
The BrakeSmart is manufactured and sold by Dr. Performance (1-877-338-7373) and reportedly for about $30.00 to $40.00 less at Trans West - (1-800-909-7071) "ask to speak with Joe or Todd in the parts department"
For our application you'll need the BrakeSmart 78001 Controller (works on any vehicle) and the 78010-5 Air Brake Harness which naturally IS only used on truck's with air brakes.
If your installing the BrakeSmart in a Generation I Volvo VNL you'll need to purchase a 1/4" OD x 1/4" OD x 1/4" ID branch tee with push-in connectors to replace the 3/8" branch tee that's included in the kit as the supplied tee is to large for our application.
 The 1/4" tee can be purchased at Suicide Doors for less than $4.00 which includes Free S&H or if your in a hurry to do the install you could also purchase a 1/4" Compression T and Coupler w/Insert which is available at Home Depot, Lowes and most hardware stores.
| From Mark & Dale Bruss (Mark): - since this tee in being installed in the brake lines, you really should look for a DOT certified tee. It may cost a few dollars more but it is a negligible cost considered the investment you are making to get a safer truck. By nature, most fittings with the slip-on connections are DOT certified. Compression fittings are highly questionable as being DOT certified.) |
 Wiring Diagram & Installation Instructions - - Required Branch Tee
Note, Mark & Dale Bruss (Mark) has photos with installation details about his BrakeSmart installations in his Generation I VNL.
 MaxBrake Brake Controller (The company has gone out of business)
MaxBrake is a fairly new company that's manufacturing the MaxBrake brake controller "aprox. $350.00 + S&H at Southwest Wheel's" that works much like the BrakeSmart in that it also senses either the application of Hydraulic or Air Pressure to the tow vehicles brakes to send brake voltage to your trailer brakes.
If you opt to go with the MaxBrake brake controller make sure you order the installation kit/system for air brakes = "MXAIR1 = Air Brake System w/T Connectors" in lieu of one of their installation kits for hydraulic brakes.
Mark Bruss is now using a MaxBrake in his Generation I VNL770 and he says the installation of the MaxBrake pretty much follows the BrakeSmart installation process as outlined by the details and pictures from his web site
Installing a MaxBrake Controller
These two controllers use brake air pressure into a sensor to activate the trailer brakes. You tap into one of the brake air lines and insert a Tee to connect the sensor.
So where is the best place to insert the Tee?

You can click on the image for an expanded view or ![]() AirBrakeSystem.pdf
AirBrakeSystem.pdf
The above air line schematic is from a Volvo manual but most HDTs will have a similar layout. If you track the Red and Green lines to item (16) the Manifold Tractor Protection Valve. This is where air lines are run to the trailer. You will note that a Black air line comes out of that Manifold Tractor Protection Valve that goes to the (22) Stoplight Switch. The schematic doesn't depict the physical placement of these items. On a Volvo, the (16) Manifold Tractor Valve is located at the rear of the cab and the Black air line runs forward, enters the cab and in the case of a Volvo Gen I (pre-2003), the (22) Stoplight Switch is located behind the instrument panel.
The reason Volvo choose to get the Stoplight Switch air from the Manifold Protection Valve is that that valve will apply braking action to the trailer if either the Red or Green air circuit is working. This is a failsafe method.
By using the Stoplight air line for the brake controller sensor means you will get a failsafe indication of brakes being applied, either by the Service (Foot) brake or the Manual Trailer Brake, item (15).
MaxBrake Brake Controller Installations for Gen I Volvo:
 This photo is from Mark & Dale Bruss (Mark) showing the Tee into the Black air line, the one from the Tractor Protection Valve. The Stoplight Switch is to the left and the MaxBrake sensor is aimed down.
With the sensor mounted here, it is inside the dash and you do not need to feed the sensor harness through the firewall.
MaxBrake Brake Controller Installations for Gen II Volvos:
Owners of Generation II Volvo VNL's (late model 2003's and up) will need have to approach installing the MaxBrake sensor a little differently. The Stoplight Switch for the Gen II Volvos is mounted on the air manifold block that is used to pass air lines into the cab at the lower front corner of the firewall. Because of this, there is no Black air line to tap in the cab.

This is a photo of the installation location under the hood on the firewall on 'Nuf Truck's (Cal)2005 VNL630. You will note that Cal tapped the Red Brake line for the sensor Tap. Mark & Dale Bruss (Mark) did a similar thing because the trailer air lines and the Tractor Protection Valve had been removed during his conversion. Only difference is that the Tee Mark installed went to the Black air line through the firewall manifold block to the Stoplight Switch and the MaxBrake Sensor inside the cab. The disadvantage of either connection is that it is only activated by one of the split brake circuits.

Bill B (Bill) has installed a MaxBrake brake controller in his recently purchased VNL630 and here is his installation photo's showing where he installed the pressure sensor that came with the controller.
As shown in the photo above, Bill opted to install the sensor under the dash near the steering wheel adjustment pedal in the cab rather than under the hood on the firewall which IMPO is a better location for the sensor.
We agree with Bill that using an air line inside the cab seems to be a better location to install the pressure sensor versus under the hood like it is on Cal's 630 where the sensor will be subject to high heat plus adverse weather conditions. Also the sensor wire harness is not as weatherproof as the usual harnesses under the hood.
The remainder of the installation process for the MaxBrake or BrakeSmart controller is the same as outlined in the photo instructions above including the wiring guideline.
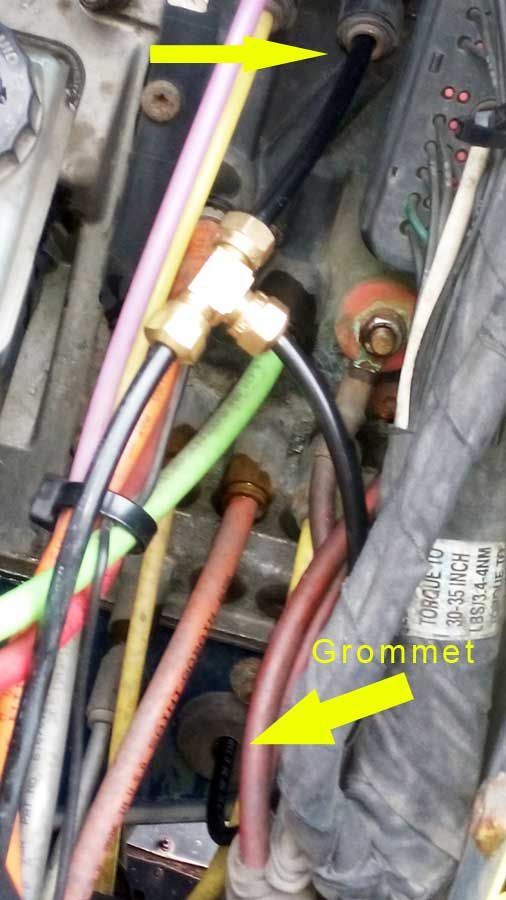
 The photo was supplied by D and J (Doug) and it shows the Black air line from the Tractor Protection Valve as described in the schematic above. This photo is from the engine side of the air manifold where the air lines enter the cab through the firewall.

Doug found an unused 3/8" plug to the left side (facing the manifold from inside the cab) of the Stoplight Switch on the cab side of the air manifold. He installed a 3/8" fitting and attached a length of 3/8" hose to the MaxBrake Sensor.
This installation is cleaner than Bill B (Bill)'s installation as no brake air line needed to be cut.
MaxBrake Brake Controller Installations for Kenworth T2000/Peterbilt:
peterbilt330.pdf is shows the installation on a Peterbilt 330. Peterbilts and Kenworths are very similar.
 Dave & Jenny (Dave) installed a MaxBrake Controller on an Kenworth T2000. "On my T2000 it got a little complicated as the only place in the dash to tap it was at the firewall behind some covers. We got it done with the insertion of a tee. A photo of that and below.
 The final mount in the dash.
MaxBrake Brake Controller Installations for International 4400:

 Don Coyote (Don) installed a MaxBrake Controller on an International 4400.
As an additional aid, Don posted a YouTube video showing the location of the sensor. It is quite a help as often it is hard to envision where close-up photos are taken.
Hayes Brake Controller Installation for Volvo Gen II:
PEIFamily installed a Hayes Controller in his 2006 Volvo VNL 670. Using the best option of tapping the Black air line from the Tractor Protection Valve as the source of the air signal.
 To get the tapped Black line through the firewall, PEIFamily drilled thru a vacant spot in the air manifold pass-thru.
Inside the cab, the Black line was connected to the Hayes Controller.