7/28/2015
Adding BluDot Brake Actuator
Upgrading to BluDot and disc brakes |
|
| Jack Mayer 26 April 2009 04:05 PM |
This it the start of the thread for the BluDot upgrade. |
| HERO Maker 26 April 2009 04:34 PM |
Great looking job Jack. As always, a very professional looking install.
Since my BluDot lines come out of the trailer closer to the street side (as you know), is there any reason I should separate them similar to what you have done, or keep them together spaced about how they are spaced from the trailer? Hopefully, I can post some pictures of this Wednesday. |
| hjsdds 26 April 2009 04:56 PM |
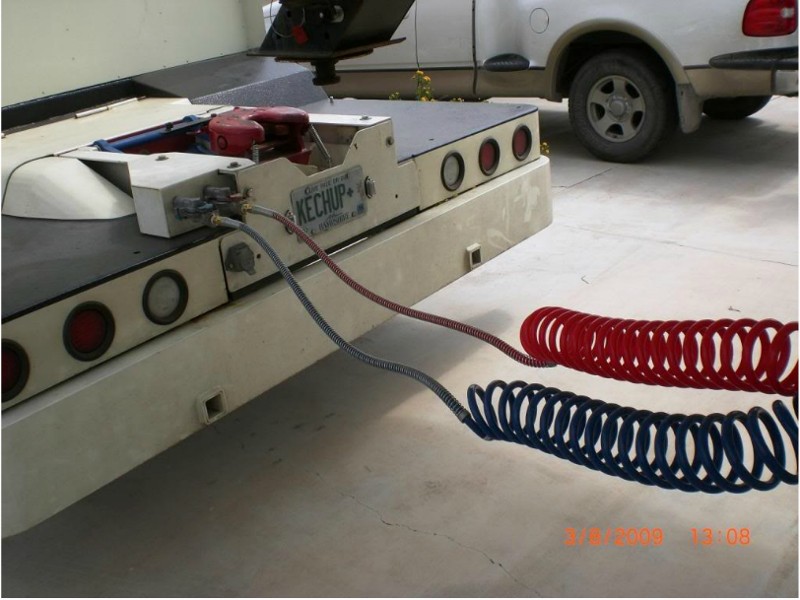
Rocky Keep them together on one side. Here's the picture how they were connected to Kechup. Jack |
| HERO Maker 26 April 2009 05:01 PM |
Henry Thanks for the picture! I had already forgotten! Guess it was the miles down from Mich. Be safe on the way home. |
| Scrap 26 April 2009 05:10 PM |
I love the fittings you used Jack. Did you get them at a Freightliner dealer? Or get a good deal somewhere else? |
| J.W. Morgan 26 April 2009 07:17 PM |
Scrap, I get the same ones from a Lawson distributor. The "Parker Store" has them as well |
| Jack Mayer 26 April 2009 07:32 PM |
Henry The disadvantage of bringing the lines out of the hitch head like I did is keeping them away from things. As you know. We will see how this technique works. I can move it around if I have to. I split them to the 2 sides of the tunnel like that to keep them untangled. It should be fine, but we will see. The biggest issue with having the hitch so far forward is keeping everything from rubbing and catching. Simulation shows the current locations should work. But I'm pulling tomorrow so we will see. |
| Scrap 26 April 2009 07:49 PM |
Na the Parker knockoffs have a brass release collar and only one sealing ring. Jack's are the SMC KV2 - my favorite of the composite swivel fittings. The re-plumbing of my truck is getting those everywhere above the rail. Problem is that our supply house for them here isn't cutting me a break, and I've had nothing but confusing conversations with our local FL parts counter. I'm hoping Jack can help arm me with the getting spot in Texas.
I know, a fitting is a fitting, but the dumb things excite me. Oh the $ I've spent on the hydraulic side of our Parker Store. |
| J.W. Morgan 26 April 2009 08:01 PM |
The Parker Store is a really cool place to shop, but my last round of push lock fittings just to plumb in 2 fuel filters was over $100.
A fitting is a fitting eh? Is that the Truck Driver coming out in you? |
| LarryandLinda 26 April 2009 08:06 PM |
Okay here's what I did on mine Larry |
| SIBERNUT 27 April 2009 07:01 AM |
....................one more rig I am not afraid to stop in front of! Good job! |
| Bill B 27 April 2009 07:56 AM |
Larry Do you have more pictures somewhere? I went to zoomshare, but that is pretty sparse - Thanks Jack Just thoughts from one that is not there and has not done one!! Thanks - posting on your web site?? Man - between your and Mark site - wow. |
| D and J 27 April 2009 08:22 AM |
Jack, (and others) One question about your tank. Any chance moisture can accumulate when you are siting idle for weeks/months? Does the bottom plug want to be replaced with a bleed valve? (Ok two questions!) |
| LarryandLinda 27 April 2009 09:16 AM |
Bill B I have a couple of pictures that are on Linda's Webshots. I tried a link from here but it does not let me. I will link them from our zoomshare Doug |
| Bill B 27 April 2009 09:42 AM |
Thanks Larry - or you could link in Webshots - wburton100 (I think) add me as a friend |
| hjsdds 27 April 2009 09:54 AM |
OK, so far I counted:
hjsdds, the Chef, Sibernut, DIYGuy, Toterman, Rocky, Larry and Jack as BluDot converts. Did I miss anyone? Still pretty small and exclusive group, but the "gospel" is spreading. I bet you Tekonsha must be shaking in their boots. |
| Kathy Detweiler 27 April 2009 10:17 AM |
Phil and I get ours done tomorrow. |
| SIBERNUT 27 April 2009 11:10 AM |
My tank fits inside the propane enclosure with a drain valve. And speaking about that, someone told me the discs I have don't like to be under constant pressure (like when you disconnect the emergency line) so I always drop my air.
Now, let's get down to the real crotch of the matter. Out of all the people listed who have done this conversion, WHY AM I THE ONLY ONE NOT HAVING A CAPITAL LETTER?? This some kind of "Lordship and peasant" thing here? Some kind of second-class thing because I haven't assumed the Mission(ary) position like you Texas landowners? |
| LarryandLinda 27 April 2009 12:41 PM |
Bill B I tried to link it directly to Webshots but kept getting an error that the Admin for this forum does not allow direct links to this web site. So being the contrary person I am and not caring whether it was me or them I linked it through our blog. Larry |
| Bill B 27 April 2009 02:27 PM |
Thanks Larry |
| 5th_Wheeler 27 April 2009 03:00 PM |
Direct LINK to Larry's BluDot install photo's from his Webshots account.
That is All....... |
| Jack Mayer 27 April 2009 03:35 PM |
The fittings come from Burton - a hydraulic and big truck supplier. Not cheap, but not too bad...they average around $6 each.
The tank does not have a quick connect fitting for a drain. But it is easy to take out the large plug on the bottom. If I have too, I'll re-plumb it for a valve. But my experience is that I won't have too. I have never gotten a single drop out of any of my truck tanks in 5 years. Not a drop..... On the back end of the tank I do have a pressure drain....like Ron says, it is likely not good to hold pressure on those brakes "forever" while parked. The valve on the top of the tank could be on either end...only 2 taps for 3/4". Could it be extended away from the tank? Perhaps, but without knowing the specifications for it I was reticent to restrict the airflow with a smaller line. As far as the sewer line location, there is not enough room to do anything behind it. There is only 4" between it and the wall. It is not as bad as it looks. Larry's job is first class - he had that great compartment to put everything in. In my case I had to sacrifice some space. I could have put the tank below the trailer....welded onto the propane tank supports facing to the front (long side along the trailer). Lots more work though, so I will try this first. And I would have to protect the lines more than inside. |
| Roger S. 27 April 2009 06:41 PM |
You can add one more to the list of converts - I added the BluDot system when I placed the order for the Teton. It was one of the best decisions I made on the coach. And, by the way, I have had some water in the tank on a couple of occasions. Roger S. |
| Jack Mayer 28 April 2009 10:43 AM |
Good to know Roger. I'll likely move my dump line to the bottom, based on that. Not a high priority at the moment. I have the fittings all made up, though.
Kodiak disc's went on yesterday. They sure do make a difference in stopping. Of course the most recent comparison is to about 2 amps going to the brakes, so that does not count - but even when the drums worked right there is no comparison. Let me put it this way.....preliminary data is on the truck stopping the combination (no trailer brakes) vs. the trailer stopping the combination with the hand valve (no service brakes).... the trailer wins that hands down. Meaning the trailer alone stops the combination way better than the truck alone. It is actually pretty impressive. I have not tried a "hard stop" e.g. a panic stop. I don't want to mess with the inside of the trailer any more than I have to. I did try some pretty "quick" stops on the way home and the combination of the truck and trailer brakes is way more braking than I have ever experienced on any truck/trailer with drums combo. I have never driven a disc brake trailer before, so I have no other comparison. I notice NO delay (any more than the truck service brakes), and did not really expect any more delay on the air/hydraulic system....so the discussions on "delay" that you hear only apply to an air/electric/hydraulic OR electric/hydraulic actuation systems. This thing is so proportional that you feel nothing from the trailer at all. One potential downside to this setup is the same as on a tractor/trailer. There is no way to adjust the amount of braking (gain) to the trailer in slippery conditions like snow or ice. And since we do not have ABS on the trailers you could lock up the trailer in a hard braking situation on a slippery road and want to swap ends. One potential way around this - other than driving PROPERLY - would be an air regulator inline to the master cylinder in the trailer. Since the air/hydraulic ration is linear, regulating the air input the master would reduce the trailer braking. How much is purely speculative, and it would have to be done manually if you were getting into snow. I'm not sure it is a problem I need to solve right now. But comments are solicited. |
| Jeff- C IL 28 April 2009 06:53 PM |
Jack: I think you are on the right track with the pressure regulator. Way back in the 30's Luxury cars had a regulating valve to adjust braking force for slippery conditions. It worked just fine, however, it was up to the driver to know how and when to adjust it. We are so used to automatic controls today that we tend to forget that a simple system that can be adjusted by an informed user can often do just as well as the fancy automatics. I would think a $20 regulator and gauge right on the dash of the truck would give you all the control you'd ever need. If you notice the trailer wheels start sliding during braking, back it off. My only worry about this would be if you forget to turn it back up and then need full emergency braking. Course, maybe I don't know what I'm talking about either! |
| J.W. Morgan 28 April 2009 07:34 PM |
Older trucks had a "slippery" or "dry" switch that turned of front brakes, they are now illegal but you could easily plumb in a switch to disable the trailer brake supply side and still keep the emergency side open to keep the brakes released. (One winter trip through WY south of Casper I ripped the electric brake box from the dash when the 5er locked up and started sliding sideways taking up almost 4 lanes.) |
| Bill B 28 April 2009 09:31 PM |
Or picking up on what Jeff C said, and electric switch on the dash and a solenoid / regulator high / low in the trailer. one position - every thing normal, other position, lower regulated braking. remember to use a quick exhaust on the let off rather than try to coming back through the regulator. Interesting thoughts. |
| D and J 28 April 2009 10:58 PM |
SMC makes some very nice 12VDC E/P controllers.
With one of these, and a potentiometer on the dash, you could dial up how much brake supply you want. Jack, I could make a few phone calls and see if I can get one as a "sample." |
| Jack Mayer 29 April 2009 10:22 AM |
"SMC makes some very nice 12VDC E/P controllers."
If I were to "somehow" acquire such a controller I would be willing to put it in and experiment with it, assuming it's specs allowed it to work with the system. It would have to allow full air pressure passage under "normal" conditions, since the breakaway and panic features of the control system allow full air pressure under those conditions. I would only want to regulate "down" under snow or slippery conditions as "required". I'd put it in this summer, but likely would not be able to do a good road test until August. But I could gauge it and test it in place. Someone travelling more with a Blue Dot might be a better "test bed". On the other hand, you have to find someone willing to "mess with" their brakes.... |
| Scrap 29 April 2009 08:51 PM |
Burton Thanks for the info Jack. With those fittings you are set so your trailer's plumbing will match your Cascadia's plumbing. Water gets in thru open gladhands laying around in the rain/snow. I know I'm bad about it. Bendix makes a trailer air dryer if it is a concern. |
| hjsdds 29 April 2009 10:06 PM |
SIBERNUT, on Apr 27 2009, 05:10 PM, said: Ron I can understand your sensitivity as to us, the early converts, vs. those who have not been "anointed" at the Mission. But looking to the future I think it should serve us well. As you can see "the Missionaries" are a pretty cohesive group and they are not shy about exerting a "group pressure" within and without. However, once we reach the twelve disciples a sticky dilemma might emerge, who is the Judas amongst us? The last disciple or one of the previous "converts"? |
| Phil D 29 April 2009 10:49 PM |
Well, Henry, it was almost me, but I'm now a happy camper.
The installation ran long yesterday, since I was having both the BluDot and the Kodiak disk conversion installed. On the way home, when I approached the first intersection at which I'd be slowing from a significant speed, the truck tried to slow but the trailer wanted to keep on going, just as it did when the electric brakes were acting up. Quite a surprise, for sure! I returned to the installer today, where they found that the BluDot system was working perfectly, but that there had been a significant amount of air trapped in the hydraulic brake system. After bleeding them again this afternoon the brakes now work as designed, and I'm well pleased with them. |
| hjsdds 30 April 2009 06:19 AM |
Phil There's a lot of hydraulic line in that system. I know when Vern and I replaced all the lines on my rig (old age) it was an effort to get all the air out from all that tubing. By the way on Dexter's disks, like the one Rocky has, the bleeder is on the outside, you have to take the wheel off to get to it. It's a pain but I guess that's the only place they could put it since it's a full floating caliper with dual pistons. |
| Roger S. 30 April 2009 08:36 AM |
Two notes of interest on my BluDot system:
I had the routine maintenance done on the Teton earlier this month. I had towed 20,985* miles since I picked up the Teton so figured it was time to check out the status of the pads and rotors, as well as having the bearings checked out and repacked. [NOTE: I am NOT on the list of those approved to work on brakes or suspensions, due to lack of mechanical ability.] The good news is that there was no significant wear on the brake components, so no replacement parts were needed. The bad news is that the tech pinched a brake line when putting a wheel back on, so I ended up with no brakes 30 miles after leaving the dealer. They fixed the problem immediately when I got back, but I learned a valuable lesson about checking with the service manager to make sure that the tech is aware of the potential for causing problems when replacing a wheel. * Out of respect for a company which has passed over the Bankruptcy River, I won't disclose how many of the miles were towed without trailer brakes due to a slight problem at the factory in Casper. |
| hjsdds 30 April 2009 10:22 AM |
Roger S. For the benefit of those of us who are semi qualified to work on our brakes, how was the line pinched? I'm having hard time visualizing how it could be done. Do you have Dexter disks on regular axles, or some other type of suspension? I see you have a 2007 model. By the way in 2007 at the HDT Rally Doonan invited the "new" CEO of Teton to give us his "vision" of the future for the company. He talked a great game, just fired the "remnants" of the old management, described how "supportive" the "new owners" were to his initiatives. Described his background, coming down from a large division at Fleetwood (isn't Fleetwood in bankruptcy too) and was taking furious notes (his "assistants" did too) of the suggestions we gave them how to make Teton a truly superior product. We can guess that our suggestions must have been taken to heart but turned out to be expensive to implement, I learned that they were actually building a unit for a customer that was approaching 1/4 million dollars. Now, not having brakes on a fifth (even a Teton) can be masked and overlooked if you are pulling with an HDT. |
| Roger S. 01 May 2009 06:53 PM |
Henry: In response to your question from yesterday: Quote For the benefit of those of us who are semi qualified to work on our brakes, how was the line pinched? I'm having hard time visualizing how it could be done. Do you have Dexter disks on regular axles, or some other type of suspension? I'm not sure if he didn't check the clearance when putting the wheel back on or whether he banged the brake line with the wheel. From the lead tech's comments I presume it was the former. I've got Dexter axles and the tech said they were dual-caliper brakes. I think that the tech pinched the line where it comes up to the outside of the disk. My lack of competence in things mechanical is showing. . . You are absolutely correct: a lack of brakes can indeed be masked (but not overlooked!) if you are towing with an HDT. I've got over a thousand miles of towing without trailer brakes and can vouch for it. As for Teton, IMHO they fell victim to Paleolithic business practices. If you were lucky enough to learn about the stone age in school you may have heard about 'slash & burn agriculture.' Early farmers would move into an area, kill the trees & burn the undergrowth, grow a couple of crops and move on when the land was farmed out and worthless. The Teton name was purchased, a couple of crops (model years) were put out and the investors took their profits and left after stripping everything of value. That's why, if I ever need another new camper, I'll pay as much attention to the business ownership as to the construction. . . |
| D and J 03 May 2009 09:07 AM |
Hey Jack, I spoke with my buddy at SMC and I can get a free E/P. The only problem is I must get one of their latest models as a sample, not the model I would spec for brake use. Their latest model is programmable on the I bus. I can program for Profibus, and for ASI bus, but I don't know I bus. Mercedes, BMW, and other automotive use I bus. (plus then you have the added cost of a controller or PLC) The 12VDC E/P (0-10 volt control) I was thinking about has been on the market way too long to get one as a sample. Oh well, nothing ventured, nothing gained. |
| Kathy Detweiler 03 May 2009 10:10 AM |
There are a couple of pictures on our blog of our new BluDot if anyone is interested. Visit My Website |
| Jack Mayer 04 May 2009 09:36 PM |
Thanks Doug. Like you said...worth a try.
Brakes performed pretty well on our 4 day trip. WAY, WAY better than the drums at their best. And TRUELY proportional...like a single unit. The bad news is I almost lost the Jeep. Hitch failure. More on that later. DO NOT TOW DOUBLES IF YOU CAN HELP IT. Things can happen. |
| J.W. Morgan 04 May 2009 10:02 PM |
I SECOND Jacks statement above. Hope every thing is okay.
Unrelated; Jack Mayer was the name of the "expert" on a History Channel Monster Quest about large wild boars. Thought you might find that interesting. He was an "old dude" but he was bald. |
| Jack Mayer 05 May 2009 09:30 AM |
All's well that ends well, Pipe. But some of your welding skills were missing from my hitch install.
I have not examined it in detail yet, but will later today. Pictures will follow. The solution is likely going to be a ladder frame to replace the C - style frame that was in place. And bolt and weld that to the frame. That will require removing the spare tire carrier and carrying the tire on the truck. No big deal. In my case I don't really have another viable solution - since I can not drive the Jeep separate. It is simply not drivable that far - the cost of making it "off road capable". Unless I build another truck there is no option to piggyback. That is why I encourage those starting out to truly UNDERSTAND what you want to do with your truck before building it up. One possibility is to leave the Jeep out west and use a Smart for transport elsewhere. I only really off-road in the west. With a rebuild of the truck body I could easily get the 16" I need to piggyback a Smart. Something to consider. Of course, Danielle's answer is to "get rid of that Jeep". |
| Hogrydr 05 May 2009 09:52 AM |
Wow Jack !!!....Your Hitch install looked very strong !!!! Am waiting anxiously for your inspection and reply.....I inspect mine after each destination...but I know you do also ....makes me even more nervous about double towing ....Thanks for any insight into what the problem was and how to prevent that from happening ......Jim |
| Jack Mayer 05 May 2009 10:02 AM |
Jim I inspect the hitch and all the welds at EVERY rest stop. These are no more than 2 hours apart. There was NO SIGN of failure at the last inspection. |
| SIBERNUT 05 May 2009 10:08 AM |
hjsdds, on Apr 30 2009, 06:19 AM, said: I adjust my Dexter discs with a mirror and 3/8 drive socket on the r front & l rear. Can't see the bubbles come out, so I just waste a bunch to be sure. Beats taking off wheels. |
| Jack Mayer 05 May 2009 01:17 PM |
How convenient.....I guess Kodiak has a superior design. |
| J.W. Morgan 05 May 2009 06:22 PM |
Jack, A set of "street" tires(+wheels) and an Atlas Overdrive would probably make that Jeep a good daily driver. You could easily haul the "off road" set on the truck, but I am betting that Danielle is not interested in driving it. Long bolts beats welding in a lot of cases. I used to weld everything till the parts that started failing became too expensive. |
| Scrap 05 May 2009 06:59 PM |
Dang Jack, you are bleeding money! Everything always dies at once, huh? |
| DJW 06 May 2009 01:12 PM |
Hey Jack 86 the jeep and pick up that 06 diesel smart in NC for 16,500 extend the bed and call it good. I would guess that at your age that off road stuff is starting to take it toll on your body anyway. LOL Dennis |
| Jack Mayer 06 May 2009 02:30 PM |
Dennis I have considered that, and it would likely make Danielle happy. Until she realizes there is no more off-road travelling AT ALL. So no more mountain scenery, no more 12,000' mountain passes, no more pristine mountain lakes. No Moab backcountry arches, etc. However, leaving the Jeep someplace out west until needed and piggybacking a Smart is a possibility. I would just drive the Jeep the little we needed it. Mostly UT, AZ, CO. |
| Toterman 12 May 2009 12:53 PM |
Just a bit of information relating to the Blue Dot: My rig sat in TX from October till April without be towed or hooked to the Volvo. Of course when I arrived last fall I just unhooked and that was that. Hung the air lines on the truck and away I went. This Spring reversed the process and away we went. Well I got out to the main highway and hit the brakes no problem. When I went to pull out the trailer brakes would not unlock. Ok jumped out ran back drained the air tank and released the brakes while sitting in the middle of traffic. Good thing to have a drain on your air tank. Pulled off the road and started trying to analyze the problem. Two calls to Blue Dot and some ideas to try with no real results. Figured that the valve controlling the brake application had failed. Off to a dealer to have that replaced. No better, figured the shuttle valve was hung up that controlled the emergency air application was bad. Bypassed it and still no brakes. So unhooked the system and came on home no trailer brakes. Not a real problem, still better stopping than I ever had with my one ton dually !!
On the way home ordered new factory valves and had them waiting when I got home. Just replaced both valves again and not success. Now I am really scratching my head! Pulled the glad hand off at the attaching point, aired up and everything was fine. Unhooked the line on the other end and no air. How can that be its one piece of tubing. pulled the line off at the glad hand and sure enough, mud dauber had sealed that line off just as slick as can be !! SOOOOO guys when you unhook place some sort of protective cover over those openings, it only cost me $300 and 2000 mile tow without brakes to figure it out. Learn from stupidity !! Have a Great Day !! |
| Bill B 12 May 2009 01:02 PM |
Dave I see that you made it - great, see you guys tomorrow. IDEA - take an other glad hand, short piece of plugged pipe for a handle, hook it up to a blanked off glad hand. Get fancy and mount it to the trailer for storage. just a thought?? |
| Jack Mayer 12 May 2009 01:12 PM |
I bought extra gladhands and plugged them. Use them as covers. On the truck side, the emergency one has an air quick connect on it. That allows me to run with the red valve in when I bobtail until I can get the bobtail proportioning valve replaced with a standard valve. The service side is just plugged.
On the trailer side (the hoses are on the trailer, unlike a standard semi setup) I just use dummy gladhands to plug it. I'll probably buy some mounts and screw them to the hitch head for plugging those hoses, but I have not ordered them yet. On the BluDot - don't forget to drain your tank for any period where your trailer is sitting for more than a day or so. It can't do the brakes much good to maintain that pressure (1000+ psi) for a long time. |
| Billr 19 May 2009 07:41 PM |
Question for you "Bludotters".
I am currently doing my research to make the move to BluDot. A recent convert from the ECR! Thanks Henry and Ron!!! I currently have tandem 8K Dexter axles and electric/hydraulic discs with Dexter actuator on a 2005 38RL3 Mobile Suite. BluDot's response: You would just need one of our air/hydraulic non-ABS actuating kits. P/N TH-2015 has everything you would need except the hydraulic brake lines (since they’re already on the trailer). This kit is supplied with a 1500 psi booster which is typically used on disc brakes. Your cost is $ 423.50. Just want to see what kits you folks have used for 4 discs? Maybe 4 or 6 doesn't matter? Wonder in the 1500psi is Ok? Noticed kits with 1000psi as well. I read though the few posts on BluDot and saw ref to both pressures. I'm still looking for my info on the Dexter discs. |
| Phil D 19 May 2009 08:28 PM |
Go with what BluDot has recommended to you. I haven't yet crawled underneath and looked at mine to see where and how the pressure is distributed to the individual brake lines, but they don't all come to the master cylinder, so the number of brakes on the trailer doesn't change the BluDot kit. |
| hjsdds 19 May 2009 10:13 PM |
The lower pressure units are for the shoe brakes, the 1500 psi are for disk brakes. BluDot picks the system which matches the pressure requirement and the fluid volume requirement for the type of the brakes and number of axles. The ABS module is not required since there is no way to sense the rotation (or lack thereof).
The single hydraulic line that comes forward is crossed and teed to all the brakes simultaneously, a break or a leak anywhere and they are all gone. Maybe in the future there will be a multichamber solution for these. |
| Billr 20 May 2009 06:33 PM |
Thanks Phil and Henry for the help. I found out the kit they recommend is correct and just doesn't have hydraulic brake line kit (don't need it). Also found out my Dexter discs are rated for 1600 PSI, so the 1500PSI unit would be fine. Bill |
| HERO Maker 23 May 2009 09:49 PM |
Do remember to cover your airlines when unhooking so you won't find yourself in Toterman's situation. I too was checking my lines coming from the trailer in preparation to hooking up to the new glad hands on the truck. One of the airlines was plugged (right at the junction of the glad hand and airline) and it had only been installed in early March! I was able to clean it out and then covered the holes. (one of those "horses out of the open barn door" in reverse things). Checked the lines all the way into the valve. I won't wait to cover them in the future. In fact now have Jack's plan of using glad hands as covers with one of them as quick connect for air from the truck. |
| Jack Mayer 24 May 2009 10:24 AM |
The best thing on the trailer side is the gladhand "holders" that you can attach to the hitch head or other appropriate place.....just hook the hose-ends up to them when sitting. Solves the trailer side problem. (For others - remember, most of us put the hoses on the trailer side - not the truck side). The truck side problem can be solved with plugs, but I prefer the spare gladhands plugged with the airline quick connect on the red line. You can also use pup gladhands which have a cutoff valve on them, but I don't like them because they are straight only - you can not find angled ones. |
| Roger S. 01 June 2009 11:13 PM |
It appears that I'm not the only one who's had brake problems after having the bearings serviced. Another Teton owner posted on the owner's group that he also lost the brakes under the same circumstances. He reported that
Quote the metallic line running from just below where the bleeder valve is located, through a slot in the brake caliper and up to a fitting on the reverse of the caliper had a hole rubbed through it. Apparently it was caused by the brake line rubbing on the inside of the wheel. . . . A worker at the shop where I had the work done told me when the work was completed that he had to remove the brakes in order to get to the bearings to grease them. He may have bent the hydraulic line during that removal. I'm 99% confident that the same thing happened to my Teton, under the same circumstances. It's just something to keep an eye out for when you have bearing or brake work. . . PS: Thanks to J2Catfish of the Teton user's group for adding detail that I couldn't fill in when I posted earlier. |
| Russ Barnes 08 June 2009 04:12 PM |
For those of you who have made the BluDot conversion or are in the process.
I have a few questions and I'm looking for ideas; If I were having a new trailer built it would be easy to accommodate the tank and the master cylinder/booster. However, now that all that "other stuff" is in the way it isn't quite so easy. I can find several places to tuck the air tank away, but I have questions about mounting the master cylinder. • First there is an issue to me that isn’t covered in the BluDot manual and that is the routing of the hydraulic line back to the axles, especially since I still would like to install the Mico system to use both electric and air brakes and that makes the chore even more difficult. • Complicating this is all the arctic pack insulation and fabric covering that Teton has on the bottom of this trailer that appears to be all sealed in place. I hate to start ripping it out. Great to keep warm/cool, but very little is exposed to route brake lines along. • Next, from what I recall of hydraulic brake system designs you don’t want to have the line from a master cylinder drop down, then go back up again, something about air bubbles being trapped? • Then the line from my electric master cylinder to the axles is 3/16” and BluDot prefers larger, like ¼” or 5/16”, what did you all do? • OK, now there isn’t a firm place to mount something as heavy as this booster/cylinder, do you all have any spare sky hooks? I can hang something from the framing for the living area floor, but that is going to really end up out in the open, where I am sure I will on occasion bump it with my head and as I lose more hair – that hurts! While it may be a fine trailer with lots of good things this Teton has a lot of wood, most of it pretty thin plywood and it is covering huge blocks of Styrofoam with no obvious way to dissect it all, it must have been built from the inside out with no regard for service. If they were in business it might be easier to find some answers, but as we know they are gone. I’m looking for a little feedback, maybe some pictures, at least something to help not only my installation, but if any others are doing this it may help all of us. I saw several of the other postings on the subject and those answered some questions and were helpful, but I thought there might be more????? |
| hjsdds 08 June 2009 05:24 PM |
NEO/Russ, on Jun 8 2009, 10:12 PM, said: For those of you who have made the BluDot conversion or are in the process. I have a few questions and I'm looking for ideas; If I were having a new trailer built it would be easy to accommodate the tank and the master cylinder/booster. However, now that all that "other stuff" is in the way it isn't quite so easy. I can find several places to tuck the air tank away, but I have questions about mounting the master cylinder. • First there is an issue to me that isn’t covered in the BluDot manual and that is the routing of the hydraulic line back to the axles, especially since I still would like to install the Mico system to use both electric and air brakes and that makes the chore even more difficult. Usually there is a single line coming to the master cylinder then to a cross fitting (first axle), a cross fitting (second axle) and a tee (third axle). The single line can be fed from two sources. • Complicating this is all the arctic pack insulation and fabric covering that Teton has on the bottom of this trailer that appears to be all sealed in place. I hate to start ripping it out. Great to keep warm/cool, but very little is exposed to route brake lines along. My fifth has fabric on the bottom too. The ran a metal strip on top of the fabric and then attached the hydraulic line along it. • Next, from what I recall of hydraulic brake system designs you don’t want to have the line from a master cylinder drop down, then go back up again, something about air bubbles being trapped? Straight run is preferred, but if you run enough fluid through the lines when bleeding the system, you'll get rid of the bubbles. • Then the line from my electric master cylinder to the axles is 3/16” and BluDot prefers larger, like ¼” or 5/16”, what did you all do? Good automotive suppliers (NAPA, O'Reiley's) stock adapter that fit into the BluDot master cylinder and accept 3/16 line (under $2 bucks). When you screw it in forget torque, unless you crank it in until you hand is in severe pain, it will leak. • OK, now there isn’t a firm place to mount something as heavy as this booster/cylinder, do you all have any spare sky hooks? I can hang something from the framing for the living area floor, but that is going to really end up out in the open, where I am sure I will on occasion bump it with my head and as I lose more hair – that hurts! While it may be a fine trailer with lots of good things this Teton has a lot of wood, most of it pretty thin plywood and it is covering huge blocks of Styrofoam with no obvious way to dissect it all, it must have been built from the inside out with no regard for service. If they were in business it might be easier to find some answers, but as we know they are gone. Hanging it on plywood is OK, put a piece of steel plate 1/8" - 1/4" on the other side of the plywood and sandwich the plywood between it and the foot on the BluDot. If it flexes a bit just thing of that wing tip bounce when that 747 takes off with in the window seat over the wing. I’m looking for a little feedback, maybe some pictures, at least something to help not only my installation, but if any others are doing this it may help all of us. I saw several of the other postings on the subject and those answered some questions and were helpful, but I thought there might be more????? hjs |
| Jack Mayer 08 June 2009 05:29 PM |
Finding the right place to put everything is the hardest part of the install. The link at the beginning of this thread will show you what I did. I would have mounted the tank under my propane tanks (because there is good accessible framework there), but I did not have time left to weld up the framework, work out all the details, and re-route the propane lines. That would have put the tank under the trailer in a for-aft (long) direction. I would have protected the airlines and valves with a metal framework. There is not issue with doing it this way - you just have to protect things enough to "set your mind at ease".
BD will give you new brake lines as part of the kit if you need them. Mine came with brake lines and all mounting hardware. My lines run along the right side of the trailer against the belly pan. They are exposed, but it is unlikely anything will "get them". |
| Jack Mayer 25 July 2009 09:03 AM |
For those wondering what became of my "broken" hitch framework....
I took it all off yesterday. The 2x2 tubing was broken through in one place - totally fractured off at the receiver weld point. The plates on the ends where it bolts to the rest of the frame/hitch structure were also totally fractured off at the welds or next to the welds. Pictures will follow. Fortunately, it is easy to replace with a stronger structure. Just goes to show you that those things that you "think" might be things you should upgrade pretty much should be done right away.....or you might end up with a Jeep on safety chains.... The good thing is that all the reinforcement of the frame I did remained intact with no issues. So at least some of the stuff I did worked.... I'll say it again. You don't want to tow double |
| LarryandLinda 25 July 2009 09:29 AM |
Jack How about some pictures Larry |